Showing posts with label tiny tags. Show all posts

Wednesday, 15 August 2012

Vintage Wedding

I thought I would share a boxed wedding card I was asked to make before the school term ended, now the wedding has taken place.


I made a matching box for the card, distressing the edges with Crumb Cake ink to give it a "vintage" feel.
I was fortunate to see one of the invitations the "bride to be" had made so I knew this would be a good match for her chosen theme.  The rosette was made using the Stampin' Up! Simply Scored board.


The card front has a ruffle of Crumb Cake seam binding ribbon and some vintage tags, stamped with the Tiny Tags stamp set, the crochet trim works well with a Vintage theme.  I added a layered frame with a First Edition paper heart - something else I spotted in her wedding theme. This is a large concertina style card, allowing enough space for all of the teaching staff at school to write their good wishes.

I placed my pre-order early this morning from the new Stampin' Up! Autumn & Winter seasonal catalogue - one of the many "perks" of being a demonstrator, I was also fortunate enough to receive a FREE product bundle from this new catalogue.  Now I'm trying to be patient while I wait for it to arrive!!!!

If you would like to find out more about joining my team of Sparkly Angels contact me to find out how you can choose £130 worth of products for just £99 with a FREE business pack to turn your hobby into a business.

Angela x

Monday, 21 May 2012

Leeds Training Swap

On Saturday I attended a training event in Leeds organised by Stampin' Up! and as usual when demonstrators gather we like to share our ideas and swap cards and projects.


I used the new hostess exclusive stamp set Pedal Presents from the summer Mini Catalogue. The image was coloured with Stampin' Up! marker pens, background clouds are sponged lightly in Bashful Blue ink using a scrap punched from a scallop circle punch, I spritzed the ground below the bike to give a light textured finish.  I used the Framelits die to cut the stamped image out and added a strip of embossed hearts with an Adorning Accent embossing folder (this is from a set of 3).

The colours for my swap are Chocolate Chip, certainly Celery, Bashful Blue and Whisper White.

Angela x

Saturday, 19 November 2011

Convention Team Gifts

Along with general swaps we also make team gifts to share with demonstrators who are part of "Julie's Jem's", this year there are 18 demonstrators attending convention at Disneyland Paris from our team.

I made another Christmas themed swap using the brilliant Pillow Box die.


The boxes are cut from Cherry Cobbler card with a piece of First Edition paper (I do love this paper!!) stamped with the snowflake trio from the Serene Snowflakes stamp set in Chocolate Chip ink .  I wrapped some Crumb Cake seam binding around the box securing a cinnamon stick and some gorgeous lace trim in the knot. I punched a Very Vanilla "snowflake" with the NEW tripple punch and another in the NEW Gold card - it is so pretty and has a soft brushed effect, a "merry" from the Tiny Tags stamp set all tied to the seam binding with some linen thread.

I will be back tomorrow with more convention gifts.

Angela x

Wednesday, 13 July 2011

Butterfly Class

This morning I held my last class before the summer break. I welcomed  three new ladies to the class - Jill, Kath and Cathy.
I chose an unusual colour scheme for the projects but I love it!!
Rich Razzleberry
River Rock
Very Vanilla

I got out my Flight of the Butterfly stamp set that had not seen ink for quite some time along with the matching punch.


This is a really simple card to create and is a very effective way of showing the differnt colours. I added a few pearls and some gorgeous Rich Razzleberry satin ribbon too.


This card uses the same colours but with more details. The background was stamped with the fabulous En Francais stamp in River Rock and the Top Note die was cut in half and embossed with the Polka Dots embossing folder with more gorgeous satin ribbon and some Tiny Tags.  The butterfly was stamped and punched out with more pearls used to give an illusion of movement.


Another Top Note die box -  this one is embossed with the Elegant Bouquet folder, I coloured the centres of the flowers with a Rich Razzleberry marker and added some Dazzling Diamonds to the top. The butterfly sits perfectly on the flowers and would be perfect for a summer celebration.

I am planning  some new classes for the Autumn with a few changes too - giving you more Stampin' Up! products -  dates and prices will be annonuced soon!!

I still have a few places left for my Strength and Hope Charity craft event, details here. Please contact me asap if you would like to book a place.  I will have kits available by post - so if you cannot get to my event why not contact me to otder your kit with your own Strength and Hope stamp set and full colour instructions to create your own set of beautiful cards.

Angela x


Wednesday, 27 April 2011

Baby Blossoms Wedding Card

I have been busy catching up with the many cards I have been commisioned to make recently, they include Weddings and Civil Partnerships, Birth Announcements and Holy Communion cards. This is the card I made for a couple getting married this weekend for my friend.


I used the delicate Baby Blossom stamp set to create the backgtound, then I used the stamp-ma-jig to create the small spray that I have cut out for the oval.  I stamped the frame and cut it out, then I used one of the stamps from the After Thoughts level 1 hostess exclusive stamp set and used the extra Large Oval Punch along with the Scalloped Oval Punch cut in half to layer it up.  The border is made using the Eyelet Border Punch. 

I was asked to make the card co-ordinate with a pink & green colour theme, so I have used Pretty in Pink, Pink Pirrouette, Very Vanilla and Certainly Celery.  I stamped a couple of Tiny tags and fixed them to the satin bow.

I have had a lovely day just making layouts for my scrap book today, I will get the pictures up-loaded in the next day or two to share with you.  My next Scrap book Club is on Friday 20th May 7.30-9.30, so if you fancy coming along contact me so I can prepare your kit and order your choice of album - I will post my layout using this months kit soon, so look out for it!!

Angela x

Saturday, 13 November 2010

Serene Snowflakes Class

Last night was my first Christmas class, we used Serene Snowflakes with vellum cardstock and some of the gorgeous new basic pearls.  This is the class all set up with the kits prepared just before my 5 lovley ladies arrived. I put out my dispaly boards filled with lots of inspiration for Christmas, including some of the swaps I made at convention.


This is what we made - a vellum tea light holder and two matching cards. We used the beautiful new Marina Mist ink and card with the delicate Serene Snowflakes stamp set, with a couple of tags from the Tiny Tags stamp set.


Everyone was delighted with their tea light holder they are very simple to make and look very effective with a little battery operated tea light inside. 

I need to finish putting my stamps away from last night as I am holding another Christmas class on Wednesday using Delightful Decorations with the fabulous Bauble punch - currently on offer £37.45 including a FREE roll of ribbon of your choice valued up to £11.45.  If you would like to take advantage of the Bundle Up for Christmas offer then you can e-mail me to place your order - I can even take payment with credit cards making it easier for you!!

Angela x

Sunday, 31 October 2010

Boo!!!!!!!

It has been quite a while since my last post but life is rather hectic at the moment!!

I have made a couple of really quick makes for Lucy & Philip for Halloween, both are the same just different colours to keep it nice and simple.


The colours used are basic black, pumpkin pie, whisper white and pear pizzaz.


The colours are basic black, whisper white, pumpkin pie, concord crush.

I have used the small speckled wheel to give the card some texture, then I have used 2 sizes of oval punch and a small circle punch for the eyes, the ruffled ribbon is basic black taffetta, I have pulled one of the centre threads to gather the ribbon before fixing it to the back of the cards.  I have stamped "Boo" from the tiny taggs stamp set and fastened it to the ribbon with some linen thread.


 I have used some of my ribbons to decorate the handles of these mini pails, filling them with a few Halloween treats to share.  I better get on and make some tea before  the mad rush for Halloween treats starts!!!

I have been busy making soooo many cards to swap at the Stampin' Up! European Convenntion at Addington Palace this week!!!!! Woooooo Hoooooo, I can't believe it is almost here, I know it will be so much fun getting together with other like minded people to talk non-stop about Stampin Up! and of course one of the best things we do get to stamp!!!
Angela x


Monday, 20 September 2010

Autumn Birthday Gift Set .......

I have made this set to give to my friend who is celebrating her Birthday this week (I know she doesn't read my blog!!), This set is nothing at all like what I had in mind when I set out to make her card last night - I was thinking of a really rich purple???? 


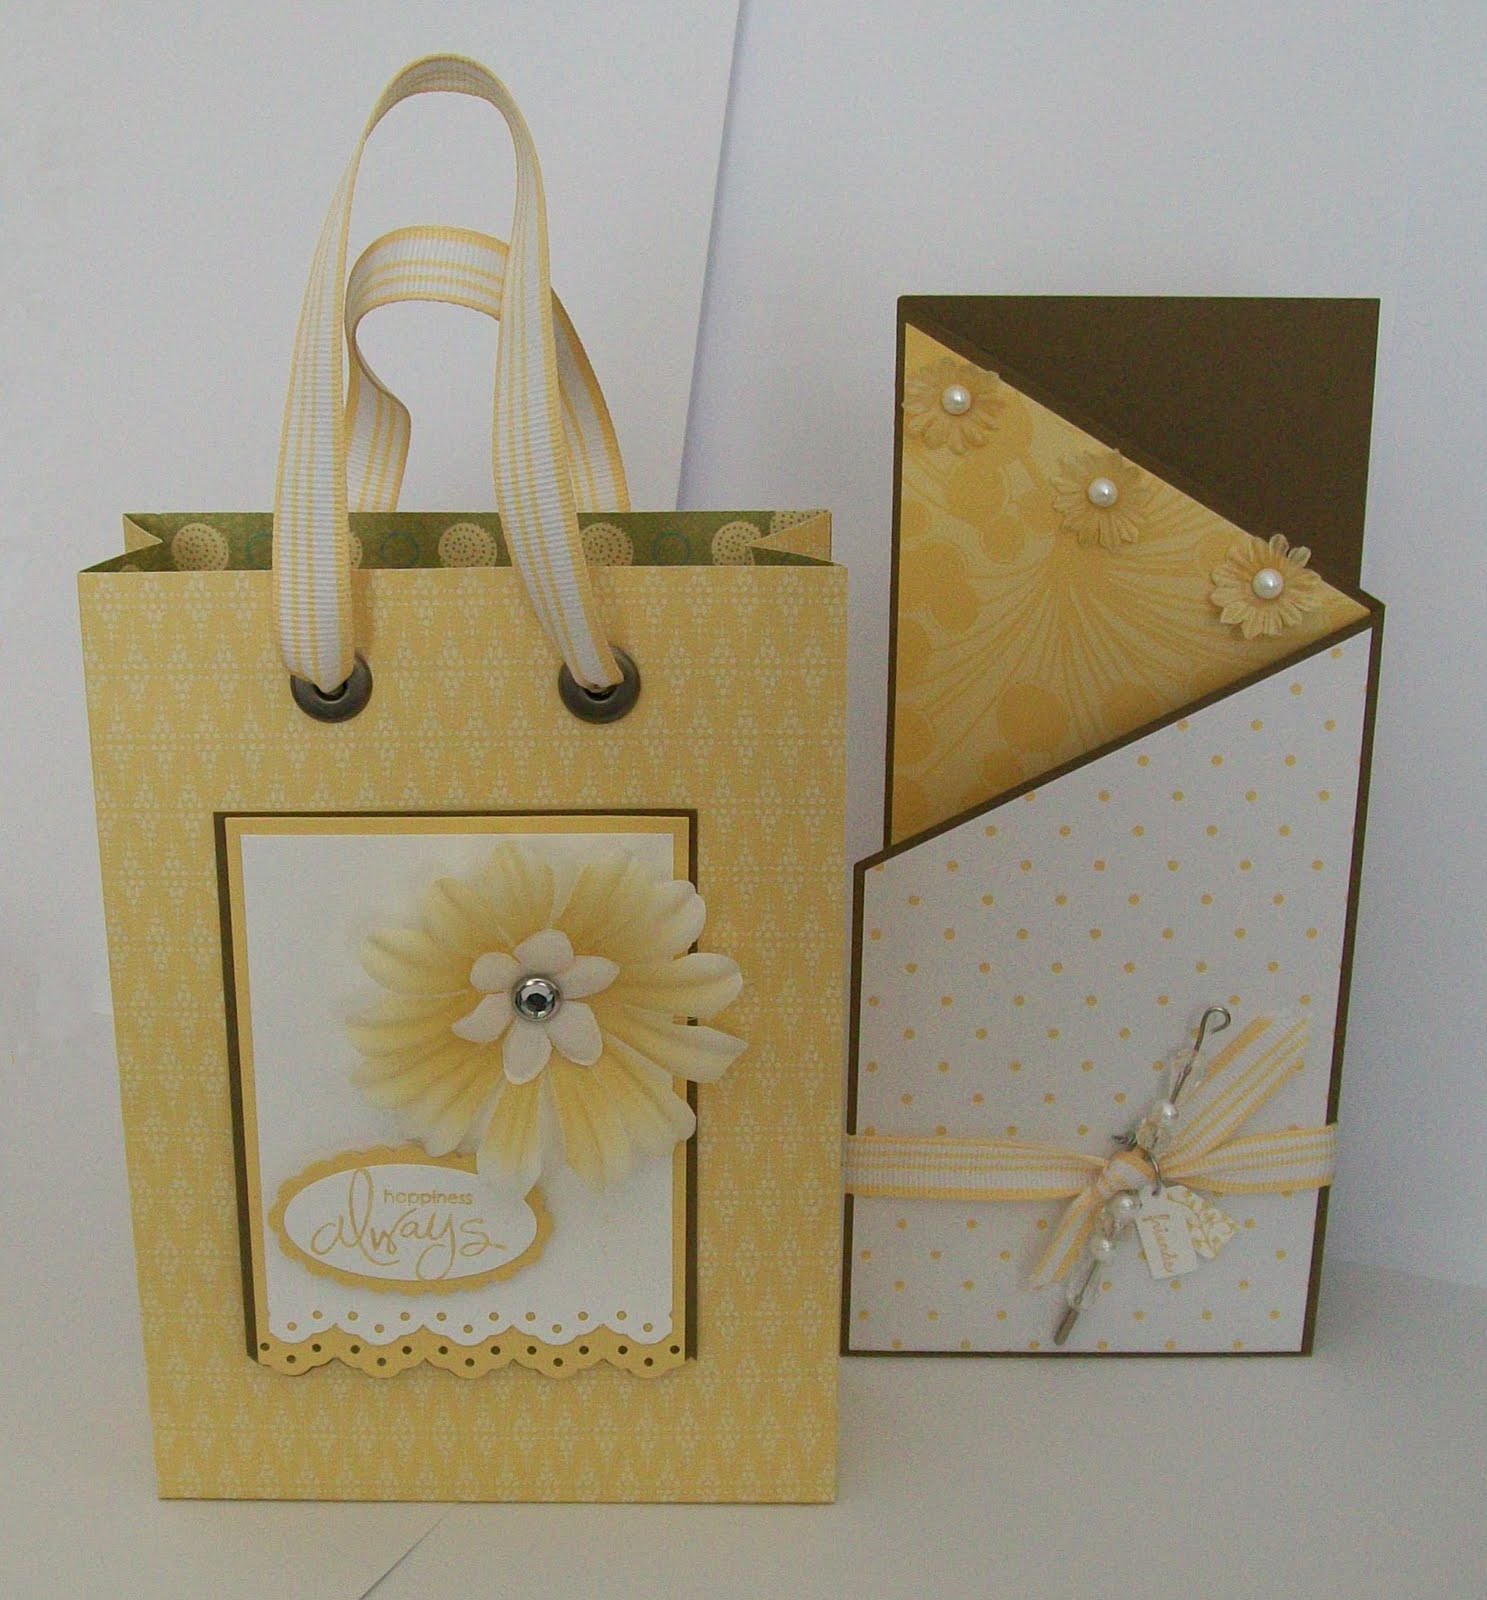
I have made a very easy gift bag from just one sheet of 12x12 paper, with a matching card, using some of the gorgeous Sweet Pea designer 12x12 paper and a selection of flowers and beads from the Pretties Kit and some of my favourite ribbon. The colours are So Saffron Soft Suede and Whisper White.


I have used my Stampin' Write marker with the blender pen to colour the flowers as they are white, so perfect to match in with any of your projects!!  The gem brads and pearls are also in the Pretties Kit.


A close up of the card front, with the beaded pin made from some of the beads in the Pretties Kit.  I tied two of the tiny tags stamped in So Saffron around the ribbon knot. The papers are also from the Sweet Pea designer paper stack.

September is the month of the Last Chance List from Stampin' Up! These products will not be available after 30th September, so if there is anything you would like contact me as soon as possible to place your order, I will be placing an order later today.

Many items now have 50% off, including the Pretties Kit ( was £23.25 now £11.63) the Sweet Pea designer paper stack (was £19.50 now £9.75) 40 sheets of best quality 12x12 papers for less than 25p a sheet!!!!  Fantastic bargain!!!

Click here for the Last Chance List


Monday, 6 September 2010

Season of Joy .......

It is a week since I posted the Christmas organiser that I took inspiration from to make this set of cards!!  It has been a busy week, but today is the start of the new school year so I'm sure things will settle down soon.  It was Philip's first day at school, he had a great time but I have to say it was a very long afternoon for me!!!


I have made this set of cards using the Season of Joy stamp set, with Old Olive, Real Red card Very Vanilla card, it is a lovely set so I'm sure you will see a lot more cards featuring this set!!  They are nice and quick to make, the eyelet boarder punch adds detail without much effort - perfect for making cards up in a batch!!


More of the gorgeous Chocolate Chip ribbon fastened with a rhinestone brad and a couple of Tiny Tags!!

Tomorrow I will be stalking the UPS delivery man as he will bring my order along with a complimentary copy of the new 2010-2011 Stampin' Up! catalogue!!!  There are so many new products in there, I don't know how long my wish list will be or if I will ever get to the end of it!!!

I have been a bad blogger this week and intend to visit my favourite blogs over the next few days to catch up!!!
                            

Tuesday, 31 August 2010

Christmas Organiser ......

I have decided to try and paln ahead and get myself organised for Christmas this year, so I have altered a  kraft journal to make a place to keep all those little things you sometimes forget!!


I have used Real Red card and ink for the base layer and stamped the gorgeous Medallion stamp at the corners, you would not believe how big this stamp is!!!  I have added a punched eyelet boarder in Very Vanilla with some Old Olive designer paper, and a length of the beautiful wide grosgrain ribbon in Chocolate Chip fastened with a rhinestone brad and two of the Tiny Tags punched out and threaded onto silver cord.  I Dasher is stamped onto Very Vanilla card in Chocolate Chip ink, layering it with Old Olive & Real Red card.  I then went a bit mad with my ribbons, filling the spirals with Old Olive & Real red stain ribbon and Old Olive grosgrain ribbon.  It's not like me to be so generous with my ribbons - hope it's not the start of anything serious!! I have added some punched tabs to divide the book and help me to find my all important "To Do" lists!!

Making this book has inspired me to make a start on some Christmas cards, I will share them soon, just a few finishing touches to complete my firsts cards of the year, phew!!


Sunday, 29 August 2010

Paper and String .......

With every delivery from Stampin' Up! there is some lovely brown packing paper - I have so much I struggle to find a good use for it other than recycling.    This week I decided to have a try at making some paper flowers with my punches.


I have used several of the circle punches to make this flower, scrunching the paper before putting a clear rhinestone brad through the centre.  The background is stamped with a flower vine from the Tiny Tags stamp set in the gorgeous new Soft Suede ink, layered up on Soft Suede card.  I have tied a couple of the Tiny Tags punched out with some linen thread, the leaves are from the Bird and Branch punch. Sprayed with shimmer mist made using the lovely shimmer paints currently available in the mini catalogue until 30th September.


I have made this card using the same colours as before.  The Very Vintage wheel has been used over some Very Vanilla card to create the backgorund.  This flower uses the scallop circle punch, I have put 9 in my flower scrunching them before putting a rhinestone brad through the centre. Another Tiny Tag tucked into the leaves made with the Bird and Branch punch and a length of linen thread wrapped around the card.  Sprayed with White Frost shimmer mist, for a little sparkle.

I still have a huge piece of this lovely brown paper, so any further uses for it would be very helpful!!!  There may be a little surprise in the post for the best idea!!!

It has been so cold here today, more like late October than August bank hoilday!!!  So much for our vist to the Maize Maze, we hid out at the cinema - it was warm and dry there!!!  Fingers crossed the sun shines on Wednesday as I'm planning to try and get to the Maze then????

We are on to the last week of the holidays, this time next week the new clothes will be all laid out ready for the morning rush to begin again -  only this time Philip will be at school all day!!!  what will I do without my "baby"????? 
                                 

Monday, 23 August 2010

Greenhouse Garden Again ......

I keep finding new ways of using this stamp set and have not put it away since I bought it!!  It was also the set we used at my class on Saturday - I will be adding the dates of my planned autumn classes in the next few days.


I have stamped a sheet of card with Melon Mambo ink using only one of the stamps from the set, the lighter shade is created by stamping again before re- inking the stamp.  It is a bold colour scheme with some of the lovely Melon Mambo ribbon (only available far another few weeks) an eyelet punched border and some of the lovely tiny tags fastened with linen thread, really quick to put together but so effective!!

There is still time to take advantage of the discounted sets on offer this month - e-mail me to place your order soon.
                      

Sunday, 15 August 2010

Cupcakes ......

I have been busy making some cards for a lady who has just opened a new cake decorating shop, she has some beautiful accessories for cupcakes too!!  I took Lucy along so we could get more supplies for her favourite treat.


This card is made using Crazy for Cupcakes stamp set, coloured with markers and a blender pen.  The colours are Close to Cocoa, Sahara Sand and Bashful Blue, I added a couple of tags from the Tiny Tags stamp set - 20%off until 31st August - tied with linen thread.  A puched star doodled with a button from the Latte collection and it is finished  - nice and quick!!!

I will share some of the other cards later this week!!  Thanks for stopping by


Friday, 13 August 2010

Summer Wedding ......

A really simple card to share today, I was asked to make a last minute wedding card for a friend.


I have used the wedding cake stamp from the Fun & Fast Notes stamp set the image was coloured with the markers and blender pen. I  punched it out with the largest circle to make the scalloped border and have punched small circles gluing them to the back of the image to make a quick scalloped mat. For the background I have used the jumbo wheel So Swirly with So Saffron card & ink these wheels make fabulous backgrounds in no time at all - So Swirly is definately my favourite!!!  The tags are from the Tiny Tags stamp set - discounted for the month of August - punched with the matching jewlery punch. Finishing off with some lovely striped grosgrain ribbon in So Saffron.

Hope you like it, I will be back soon!!!
                            

Tuesday, 3 August 2010

Two Step Stampin' August promotion with Tutorial .......

You might want to go and make a cup of tea before you start as it is a long post, but I think it is worthwhile to show the stunning effects you can get from a Two Step stamp set and it is very easy to achieve fabulous cards in hardly no time at all.

I have used the beautiful Greenhouse Garden stamp set again along with the Tiny tags stamp set available from the mini catalogue - both sets are included in the current promotion.  The colours are Real Red, More Mustard and Basic Black, I have used Very Vanilla card for stamping on. You will need a stamp-ma-jig to line up your stamps perfectly, but it can be used with any stamp especially when masking images.


1.  Start by inking your solid flower in the lightest colour, randomly stamp over your card.


2. Take the clear window sheet from the Stamp-ma-jig and line it up square with the corner, the take your inked stamp and stamp directly on to the window sheet.
                    

3. Now take the clear window sheet and lay it over the solid image to line up the second stamp.


4. Carefully remove the window sheet keeping the handle in place and stamp your second image.


5. Continue stamping the second layer, you can see the stunning detail easily achieved using two step stamping.


6. I finished the base card with the smaller flower using the same two step technique and then I randomly stamped another flower center  in More Mustard to fill in between the flowers - it reminded me of a corn field with bold poppies.


Now your background piece is ready to be cut down to size and layered up on your card base.  I used real Red & Basic Black along with some gorgeous real red stain ribbon finished in a flat bow from the mini catalogue. I have stamped the card base with More Mustard and the same flower centre.
                                          

Friday, 16 July 2010

Wedding Day Wishes ......

Today I am sharing with you one of the many Wedding cards I have been asked to make lately, I am almost finished all of my orders, then I must get the rest of my Teacher thank you cards finished!!!  Not long to go now until school is finished for the summer!!!!!


I  had a few problems with colouring this image and on more than one occassion the colours had bled which is so annoying, I have changed my card now and have had no more problems.  I have used some of the beautiful Bella Blue papers from Stampin' Up! along with kraft card (soon to be called crumb cake), you can see my favourite eyelet border punch here again.  I added kraft taffetta ribbon with some of the Tiny Tags stamps, punched with the matching jewellery punch.

I'm off to Leeds tomorrow with some friends to Julie's all day craft event,  so I will no doubt have some beautiful projects to share with you next week as Julie always inspires me when my mo-jo has gone off on a walk about!!!


Tuesday, 11 May 2010

Tiny Tags .......

This is my second post toady, as I managed to get this card made this morning along with finishing my cards for tomorrow!!!


I have made a Wedding card, with some of the gorgeous new products from Stampin' Up! This time of year it is handy to have a couple of Wedding cards ready, this is the first one, I have another card to finish, so I will show you that later in the week.  I have used the beautiful Melon Mambo card, with the So Swirly wheel, these are perfect for making quick backgrounds, layerd on to Basic Black card I have stamped some of the brilliant Tiny Tags and punched them out with the matching punch, the ribbon is the new Polka Dot grosgrain ribbon in Melon Mambo.

If you want to get your hands on some of these gorgeous new products, you can read more about it here!!

I an entering this card into the following challenges,

Charisma Cardz - All about weddings,

C.R.A.F.T. - Wedding

One Stop Craft Challenge - Wedding Wishes

Don't forget to  pop by tomorrow, I have my Design Team cards ready for Your Next Stamp and Truly Scrumptious.